Hello and welcome to my blog where I share my photos and experiences from my travels to the African bush and other wild places.

Sunday, July 1, 2012

STALKING LEOPARD

Like most people, leopards are my favorite animal. Not only do they have the most beautiful coat, but they move graciously and have a magical secrecy about them. They are one of the iconic animals of Africa. I followed a male leopard in the Masai Mara National Reserve in Kenya while he was on the move and looking for a meal. The Masai Mara is known for its great open plains which is not your most typical habitat for leopards. This leopard had some difficulty moving from one cluster of bushes to the next without giving his position away to a grazing herd of impala. At some stage he was walking down a large grass covered hill, lying down, then stalking, and moving forward slowly again. We positioned our vehicle at the bottom of the hill and were lucky to capture this stalking posture at eye level, as he was moving down.


Stalking leopard
Masai Mara National Reserve, Kenya
Canon 1D Mark IV | Canon 600mmf/4 | 1/1600 sec at f/5, ISO 800

Tuesday, June 12, 2012

SPEED UP LIGHTROOM

Many of you would agree with me that Lightroom has become the leading photo management software and it has certainly been an integral part of my digital workflow for many years now. I initially started with Lightroom 2, then upgraded to 3 and now recently to Lightroom 4, which I love. The improvements they have made in each upgrade satisfied most of my personal requirements for this software and resolved the issues I had with it at that time.


Develop Module in Lightroom 4.1


I have compiled a list of recommendations that might help you improve the performance of your Lightroom setup regardless of which version you might be running. I currently use Lightroom on a slow computer by comparison (Macbook Pro 15", 2.8 GHz Core 2 Duo, 8 GB 1067 MHz DDR3 RAM, 7 200 RPM 750 GB hard drive, running Lion OSX with 150 000 photos and videos in my catalog) and thus I can clearly see how these reccomendations impact the performance. I have listed them in the order starting at the most important. Please feel free to email me at isakpretorius@gmail.com if you have any additional inputs and I will keep this list updated!


1) UPGRADE COMPUTER SPECS

Faster hard drive, faster processor and more RAM (memory). This one is quite obvious and upgrading any of these components should make a difference. I've noticed a big improvement when upgrading my RAM from 4 GB to 8 GB and my hard drive from 5400 to 7200 RPM.


2) ENOUGH AVAILABLE HARD DRIVE SPACE

Some people suggest you should have at least 50% of your local hard drive space available. I've noticed that if I keep at least 10% of my local hard drive space available it makes a significant difference in Lightroom's performance. Thus, on my 750 GB hard drive I make sure I keep more than 75 GB space available.


3) CLOSE UNNECESSARY APPLICATIONS

For the seasoned computer user this is a no-brainer. All applications use processing power and RAM, thus Lightroom will run much faster when it does not have to share resources with the other applications.


4) KEEP THE CATALOG ON YOUR LOCAL HARD DRIVE

The Lightroom catalog file is a database that stores small jpg versions of each file, development changes made to the images and associated data like keywords, collections and star rating. The catalog is effectively what you see on the screen when you use Lightroom. You can still run the catalog of Lightroom and see your photos even if you are not connected to your original photo files. There is a lot of data that continuously move between the application and the catalog file as you use Lightroom. Thus, it is important to give your computer the fastest possible access to the catalog file.


5) RESTART OCCASIONALLY

As most IT professionals know, switching a computer off and on again solves most of the problems users encounter. When I have not restarted my computer for about a day and I encounter sluggishness from Lightroom I simply restart my computer. Whether this is based on logic like memory leaks for example I'm not sure, but it usually does improve the performance again.


6) BACKUP AND OPTIMIZE AFTER SIGNIFICANT CHANGES

Optimizing your catalog regularly is good practice. I've noticed that after adding or deleting lots of images my system becomes slow but after optimizing the catalog the performance returns to the level I'm used to. Backing up your catalog and storing it on another disk is recommended to make sure you don't loose your catalog when your hard drive crashes. I've setup my Lightroom to prompt me to backup and optimize after every exit. I mostly skip this, but once a week or after significant changes I do select to backup and optimize.

Lightroom > Catalog Settings > General > Back up catalog > Every time Lightroom exists


7) RENDER PREVIEWS IN ADVANCE

With both the standard-sized and the 1:1 previews rendered there should be no delay in displaying the images in a grid, full screen size and zoomed to 100%. It is frustrating when clicking on a photo, zooming to 100% and then having to wait while it builds the 1:1 preview for the first time. I usually select the new images in my catalog and initiate the building of the 1:1 previews before I go to bed to let it run over night. If you have never done this before it might take a few nights before everything has been built.

Library > Previews > Render Standard-Sized Previews Library > Previews > Render 1:1 Previews


8) KEEP YOUR PREVIEWS

Lightroom automatically deletes the 1:1 previews after a while. This means that you end up with the same problem of having to wait for a few seconds every time you zoom an image to 100%. Lightroom can be setup never to delete the 1:1 previews. I've noticed that when setup like this Lightroom runs much faster since it does not continuously have to search through my images to see which previews it needs to delete.

Lightroom > Catalog Settings > File Handling > Automatically Discard 1:1 Previews > Never


9) SET YOUR PREFERENCES

Make sure you adjust the size of your previews to fit your screen resolution. If your screen is 1440 pixels wide for example then building your previews as large as 2048 pixels will make your system unnecessarily slow. Choose the option closest to, but not smaller than your screen resolution. Set the preview quality to medium instead of high. You won't see the image at the best quality while you edit it, but this might make such a big improvement in performance that it will be worth it.

Lightroom > Catalog Settings > File Handling > Standard Preview Size > 1440 pixels Lightroom > Catalog Settings > File Handling > Preview Quality > Medium


10) LEAVE AUTO WRITE XMP TURNED OFF

When you work with other applications like Adobe Bridge for example it might be beneficial to have this feature turned on. What it does is it stores all changes made in Lightroom, e.g. keywords or contrast and brightness, in an XMP file next to the original file. The changes you made in Lightroom will be reflected in Adobe Bridge and visa versa. It does slow Lightroom down, so my advice is to switch this feature off regardless. You could still export the files with an accompanied XMP file from Lightroom even if you have this feature turned off.

Lightroom > Catalog Settings > Metadata > Automatically write changes into XMP > "uncheck"


11) RUN IN 64-BIT MODE

Running Lightroom in 64-bit mode will utilize all of your RAM and not just 2GB which is the ceiling for 32-bit operating systems. If you use Mac it automatically runs in 64-bit. Windows users should check which version they run.


12) FASTER CONNECTION TO EXTERNAL DRIVES

If you keep your image on an external drive then upgrading the speed of the drive or the connection type will improve performance. In most cases the limiting factor is the connection type. Upgrading it from a USB 2 connection to a Firewire 800 connection for example will make the connection significantly faster. Here is a list of common connection types, listed from fastest to slowest: eSATA, USB 3, FireWire 800, USB 2, FireWire 400, USB 1


13) INCREASE THE SIZE OF THE CAREMA RAW CACHE

While you edit images in the Develop Module Lightroom renders new high quality previews with each adjustment you make. It stores and access the file you are working on in the Camera Raw cache. The cache is a specific folder on your hard drive assigned for this task and you have the option of increasing its size. By increasing the size you allow more images to be stored in the cache and performance will be greatly improved as you go back and forth between editing a selection of images. After all the images in your selection have been edited you can purge the cache to make room for new ones. My suggestion is to increase the cache to 30 GB.

Lightroom > Preferences > File Handling > Maximum Size: > 30 GB Lightroom > Preferences > File Handling > Purge Cache


14) SMALLER CATALOG

Lightroom 2 certainly had problems with large catalogs. I have been running Lightroom 4 with a large catalog without any problems. My workflow involves only marking photos to delete during the month, but then at the end of each month I bulk delete them all at once. After the bulk delete I optimize my catalog again. It might just be my imagination but common sense would also suggest that after decreasing the size of the catalog Lightroom does run faster.


15) DEFRAGMENT THE HARD DRIVE

As you add, delete and move files on the hard drive, its available space is no longer in a single continuous block. Without enough continuous space the system has to break up files and split them across your hard drive in the available small spaces. This is called file fragmentation and slows the system down. By doing a disk defragmentation you can improve the performance of your system. This can be done manually every now and again on the Windows operating system while Mac hard drives do this automatically.


16) INSTALL LIGHTROOM AND OS UPDATES

Most software are continuously being improved with updates released by its software developers. These often include bug fixes that will improve the performance of your system, the operating system (e.g Windows 7 or Mac's Lion OSX) as well as your software applications like Lightroom. It is thus recommended to keep both up to date with the latest updates.


17) TURN OFF THE SECOND WINDOW VIEW ONTO AN ADDITIONAL SCREEN

If you have a computer setup with two screens then Lightroom has the feature of splitting the application across the screens in a second window. This is very handy as you might have the image in grid display on the one screen and the selected image full-screen on the other. On my system I've noticed that browsing through the images using the second screen option slows down Lightroom's performance. I'm not sure why this would be, maybe insufficient power of the graphics card or perhaps Lightroom has to collect too much information to be displayed onto two screens and thus making it slow. Now I have Lightroom open full screen on my Cinema Display while I have other applications like mail and safari open on my Macbook's screen. This seems to work much better.


18) RENDER PREVIEWS OF SELECTION

When I've been working with Lightroom for a while and I choose another collection of images to work with, e.g. selecting a day folder to review images in that folder for the first time, I find that Lightroom becomes sluggish. It becomes slow bringing up the next photo or have a slight delay in showing the next photo clear and sharp. This is frustrating since I know that I've rendered both standard-sized and 1:1 previews for the images in this collection before. The solution I found is without a logical explanaition: I select all the images in the collection I'm working with and render both standard-sized and 1:1 previews again. Lightroom looks through the selection to see which ones to render but finds none since they have all been rendered before. After this "check" the Lightroom performance is back to normal.

Library > Previews > Render Standard-Sized Previews Library > Previews > Render 1:1 Previews


19) TURN OFF INFORMATION IN GRID DISPLAY

In the grid display in the Library Module one can choose the information to be displayed around the thumbnails of the images in the grid. I found that turning off the information speeds up the performance of Lightroom when I browse through the images in the grid display.

View > Grid View Style > Show Extras > "unselect" View > Grid View Style > Show Badges > "unselect"


Click here to learn more about Lightroom and my courses on offer

Friday, June 1, 2012

AFRICAN HIDES

If someone asked me about hide photography in Southern Africa a year ago, I would have told them that we do have hide photography and it's great. I often photograph at the some of the hides at the Marievale Bird Sanctuary, as well as the Kruger National Park has a couple of good hides and people have mentioned hides in South Luangwa although I have not seen any good photographic material from there. Oh yes, there is also the vulture hide at Giant's Castle that is very popular but you have to book a year in advance to secure your spot. I'm one of many wildlife photographers in Southern Africa who is always complaining about how few good photographic hides we have but then tend to also do little about this.


Down for a drink
Mashatu Game Reserve, Botswana
Canon 5D Mark II | 16-35mmf/2.8 | 1/800sec at f/8, ISO 400


Bee-eater portrait
Mashatu Game Reserve, Botswana
Canon 1D Mark IV | 600mmf/4 | 1/320sec at f/4, ISO 1600


Photographic hides are different from the normal wildlife observation hides as they are designed with location, orientation for light, position and angle in mind. Both types of hides are basically a four wall enclosure, located next to an animal attraction with a small opening to observe the animals that are in turn oblivious to your presence from behind the protective walls. With photographic hides the orientation relative to the subjects is critical so that good quality light illuminates the subject from the right direction. The hide is positioned close enough to the subjects so that they can fill your frame, or as close to it as possible anyway. The viewing angle is also critical, to photograph the animals at their level, and not from too high up so that you don't end up photographing down onto the animals.


Bath time of a different nature
Mashatu Game Reserve, Botswana
Canon 1D Mark IV | 600mmf/4 | 1/2000sec at f/5.6, ISO 1000


South Africa clearly lacks spectacular photographic hides, despite the few mentioned above. While visiting most of the normal wildlife observation hides I've always thought to myself, if they could just lower the hide slightly, or change the orientation so that we can photograph with the sun, or maybe build the hide a few meters closer to the water, our photographs could be truly spectacular instead of just average. A little thought applied could have made a big difference without having to cost extra.


Reflections
Mashatu Game Reserve, Botswana
Canon 1D Mark IV | 600mmf/4 | 1/2000sec at f/5.6, ISO 400


Recently a young man called Bence Mate from Hungary changed our world by showcasing the spectacular photos he got from his innovative hides he constructed in his home country as well as with hides he built in Cost Rica and Brazil. This really showed that a well thought out hide concept at a wildlife hotspot can generate fantastic results. In Africa we are spoilt by an abundance of wildlife right on our doorstep and that is probably why we have not been forced to be innovative in obtaining photographs from hides.


Small sips
Mashatu Game Reserve, Botswana
Canon 1D Mark IV | 600mmf/4 | 1/320sec at f/4, ISO 500


In Southern Africa, some incredible photographic hides have been recently constructed at Mashatu Game Reserve in Botswana. This has created a buzz in wildlife photographic circles and is something we are all very excited about. The last hide has just being completed and I have had the privilege to experience some of them. There have been incredible photos taken in just the first few weeks of operation. The collection of hides consists of an underground elephant hide, a bird hide, an infinity hide, and a semi-permanent movable hide. The elephant hide is sunk into the ground right next to a waterhole in prime elephant habitat. You photograph out at ground level and looking up at elephants three meters away from you, which is a thrilling experience. The bee-eater hide is perched on the side of the Mojale river overlooking a white-fronted bee-eater colony. The birds are residents so you can photograph them all year round. The infinity bird hide is built on the side of a rocky cliff where the focus is on two small shallow pools. With the water surface at eye-level the edge of the pool disappears into the distance creating the illusion of the water flowing into infinity. The semi permanent hide is built light to move from one location to another, setup at the most productive location on the reserve at the time. With location, orientation for light, position and angle in mind the hides offer exceptional quality shots. Wildlife photography can be difficult enough at times, but here some of the usually uncontrollable factors have already been taken care of, giving you the photographer a great advantage.


Inside the hide
Mashatu Game Reserve, Botswana
Canon 5D Mark II | 16-35mmf/2.8 | 1/200sec at f/11, ISO 160


We all love innovative new ways of photographing wildlife when this is done responsibly and with respect to the animals and their natural environment. The hides at Mashatu will surely be the start of a trend in Southern Africa that is already long overdue and we have exciting times to look forward to.


Elephant dance
Mashatu Game Reserve, Botswana
Nikon D3s | 200-400mmf/4 | 1/250sec at f/5.6, ISO 800


If you'd like to join me at the Mashatu hides for a workshop, we have two scheduled iteneraries, 27 June - 1 July 2012, and 13 - 17 July 2012. Contact me by email at isakpretorius@gmail.com for more information about these trips or any custom dates.

Wednesday, May 16, 2012

ELEPHANTS ON FIRE

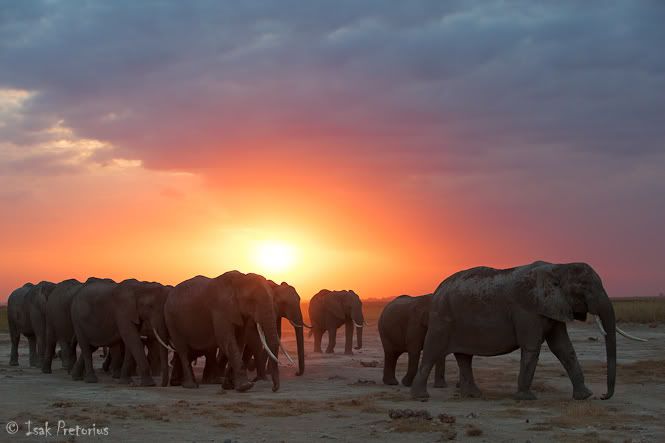
The last light in Amboseli National Park created a dramatic sunset and perfect backdrop to a herd of elephants returning home after the day's foraging in the marshlands. It is hard not to enjoy every minute spent in this jewel of the African parks. It is a great place to enjoy watching the African elephant as they are scattered all over the plains at the foot of the iconic Mount Kilimanjaro. This evening will be remembered however for my frantic search of a decent photo in anticipation of an approaching dramatic sunset. I was driving along a road that the elephants usually cross on their way home from the plains. I could see a gap in the clouds on the horizon where the last rays of sunlight would peep through and I knew it would be spectacular. I was missing a foreground subject however. Every few meters there were elephant paths crossing the road but there were no elephants in sight. The sun started to light up the clouds in a beautiful red color when my luck turned and I saw a herd of elephants approaching the road a few hundred meters ahead of me. They were in a hurry and I made it just in time to get my photograph of them with the sunset backdrop.


Elephants on fire
Amboseli National Park, Kenya
Canon 5D Mark II | 70-200mmf/2.8 | 1/200 sec at f/5.6, ISO 400

Monday, May 14, 2012

GECKO IN THE DUNES

The fog belt that stretches across the red dunes of the Namibian coastline hides many secrets. This 5 km wide strip off the coast has its own unique climate with morning and evening fog and hosts some unusual creatures: Sidewinders (Peringuey's Adder), FitzSimon's Burrowing Skink, Namaqua Chameleon, Swift Sand-diving Lizard and the Web-footed Gecko (Palmato Gecko) to name but a few. In April 2011 I set out on a photographic mission, to experience and photograph the wonders of the Namibian desert. After discovering the landscape spectacles of the Namibrand and Sossusvlei dunes, I ended up at the town of Swakopmund looking for the little critters I've heard so much about before.


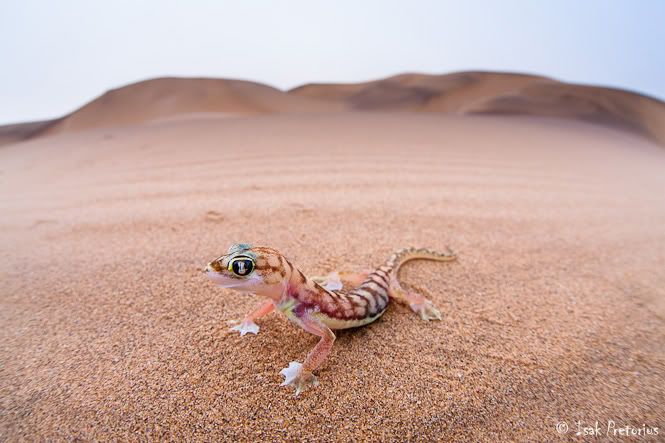
Gecko in the dunes
Swakopmund, Namibia
Canon 1Ds Mark III | Sigma 15mm | 1/80 sec at f/11, ISO 800


With the help of a local guide we spent 4 days driving along the dunes and finding everything from scorpions, sidewinders, gecko's, chameleons and beetles. One of my photographic objectives was to capture the essence of the web-footed gecko. I was inspired by photographs of this little critter I've seen from Heinrich van den Berg. The geckos name originates from the web between their toes and is now known as the "palmato gecko". I still prefer "web-footed gecko". They are nocturnal with a beautiful light pink and blue translucent skin. Sunlight would kill them instantly so in the daytime they hide in the sand, about two feet under the surface. Early in the morning you still find them out on the dunes hunting for prey when there is fog. This usually only clears by 9am in the summer months. When they encounter any threat, like humans, their only defense is to run away.


I had a specific shot in mind. One where the gecko has a striking curved posture but where it also shows the environment they occur in. This required ultra wide angle portrait shots. I was faced with two problems: The fist is that the web-footed gecko is surprisingly small, only about 4cm long. This meant that if I wanted the gecko to appear large in my frame using an ultra wide lens, I had to get extremely close to it. All of my ultra wide lenses, the Canon 16-35mmf/2.8, Canon 10-22mmf/3.5 and the Nikon 14-24mmf/2.8 have a minimum focus distance that is too far, at around 25 millimeters. If I had the gecko in focus at the minimum focus distance it would result in it being too small in the frame. The solution was borrowing the Sigma 15mm fish-eye lens from a friend, with a minimum focus distance of a mere 15 millimeters. That is such a great lens and a pity it is not made anymore. Finding one second hand is almost impossible.


The second problem I was faced with was that I had to find a gecko specimen willing to be photographed at such a short distance, in the right location for the perfect backdrop, and with the perfectly curved posture. The answer to this was, of course, four days of trekking geckos across the dunes, multiple shots, multiple angles and cleaning a lot of sand grains off my equipment until I got the perfect shot that I had envisaged. There are many things I believe can be improved about this photograph, and I believe it's important never to feel too complacent about your results, but the four days of fun trying to capture the perfect frame was the prize for me.


This image won the April leg of a major South African wildlife photographic competition.